 Legoaizer -
Help Legoaizer -
Help |
Legoaizer -
Help
Tutorial for Sideways
Legoaizer
has
two distinct ways of building a mosaic: placed on a base plate (all studs
visible) or stacked on each other (studs only visible at the top of this wall).
The latter is called 'Sideways placement'
. This is a
short tutorial, there is not really so much rocket-science to understand
and to create a perfectly looking wall of bricks. The picture below shows the possibilities
of using sideways mosaic, e.g. entirely made of duplo bricks.
Lesson 1: My first sideways mosaic
You can select 1-stud wide bricks, but in practice your wall will be very vulnerable of collapsing when the wall reaches significant heights. On the other hand, when using 2-stude wide bricks the cost may be getting too high. It's a choice you have to make yourself. We will assume you have selected 2-stud wide bricks. We have selected basic sizes only with even number of studs: 2x2, 2x4, 2x6, 2x8 and 2x10 studs. The colour palette for this selection is quite big: 131 brick-colour combinations (5 bricks, 42 colours). Save the set, and check the option 'Bricked like a wall' in the Mosaic size pop-up window.
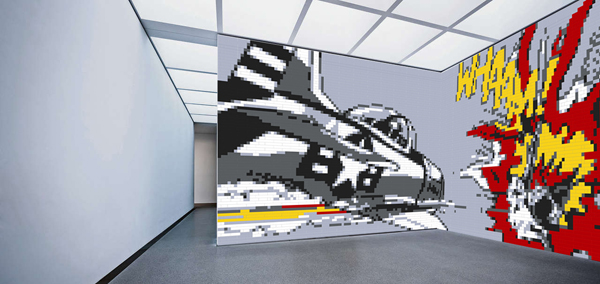
Then press the 'Create mosaic' button and you are done. This is what you will see (the inset is the full picture; the background is only showing a part of the wall):
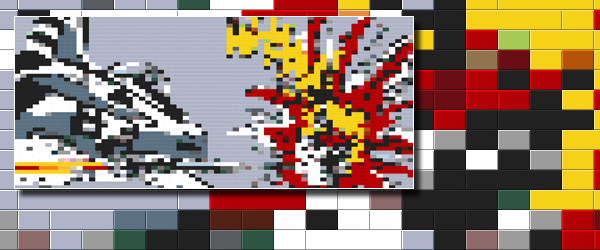
Result of
lesson 1: the famous 'Whaam' poster, 128 studs wide and 90 brick
high
Lesson 2: More
is better
There is a clear disadvantage over a normal mosaic: the normal mosaic can also place bricks on the vertical, and has 1x1 bricks available. If this mosaic was made with 128 studs and placed on a base plate the picture has much more sharpness and details. For that reason sideways walls are usually requiring more bricks, about a factor 2-3. So... brick wall mosaics are much more expensive. But that is what it is. If we would create a higher 'resolution' of this Whaam poster we would need perhaps more than 300 studs on the horizontal.
In the picture below the results are shown, compared with the original. The size of the 320 stud result is 128 x 54 cm in size when made from brick. This would then be twice as much when duplo bricks would have been selected.
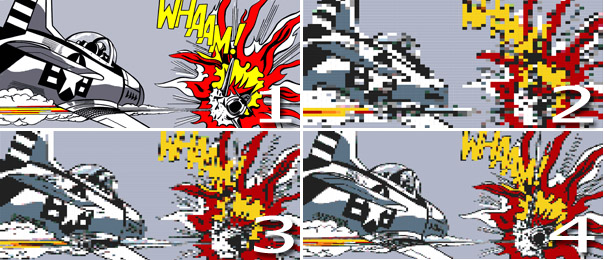
Result of lesson 2: 1: the original, 2:
128 studs (187 euro), 3: 224 studs (570 euro) and 4: 320 studs (1139
euro).
By comparison: the picture below shows the difference between 128 studs sideways (left, 187 euro) and normal (on baseplate, right, 213 euro).

Lesson 3: Using duplo bricks
The use of duplo bricks has a couple of advantages over using bricks: it is much sturdier (size matters here as well) and the wall gets build much faster (duplo bricks are twice the size of bricks). To make a 100% duplo brick wall we will first need to select the duplo bricks from the bricklink database.
To make a new database, open the application, select Colour table, then Bricklink and 'Bricklink' colour table. This will open a fresh almost empty set of bricks. Uncheck the first brick (2x4 plate), then scroll to the right until you have found the duplo bricks. We will only use the 2x2, 2x4, 2x6, 2x8 and 2x10 bricks. The 2x3 brick is available, but since there are no 1x2 duplo bricks to compensate for the odd number of studs in the wall, the application will ignore these bricks anyway. We have put them in the database in case you manually want to use two 2x3 to replace one 2x6 brick. But this will not be possible from the Legoaizer application, just when actually building the wall.
So, we have selected these even studs bricks, and selected the colours we want to include. Then save the data set, and load into the current colour set, to effectively replace the set with the duplo set. When all is done correctly, you will now also notice the word 'duplo' (on the right) in the status bar. When this is visible you have a 100% duplo database available. Then set the mosaic dimensions, and press the 'Create mosaic' button again. This is what you will see:

Results from lesson 3: left the brick
(128-stud) mosaic, right the duplo (128-stud) mosaic.
There isn't so much difference with the brick version, except the price: 187 euro for brick and a whopping 1004 euro for duplo. Why so expensive? The price of a white 2x2 brick is on average 5 cents; the same 2x2 duplo brick is 24 cents. But the upside is that the bricked wall surface is now 4 times larger: 128 x 54 cm is now 256 x 108 cm. For what it's worth.
Lesson 4: using 1-stud
bricks
As explained in lesson 1 and 2 it is
possible to use 1-stud bricks in a sideway mosaic. The selection of bricks
determines what kind of mosaic pattern generator is used. Only when all
bricks are 2 studs wide (or high; it's
a matter of size definition) the duplo engine will be used, also if
these brick are 100% bricks. For all other cases the brick engine will be
used.
The main difference between the duplo and the lego engine is the way the internal size is managed: the duplo engine first reduces all the bricks to a 1-stud wide brick, and then generates the mosaic; resetting the reduction after successful creation. In case a mix of 1 stud and 2 stud bricks is found: the lego engine is used.
Except for one brick: the 1x2 brick can be used for sideways. When selected in the brick set, this brick will be reduced to 1x1 and the lego engine will then be able to make a successful sideway mosaic. This 1x2 brick is basically a 1x1 (width x height), compared with e.g. the 2x2 brick who is then basically a 2x1 brick (width x height) in the brick wall.
Hopefully this sufficiently explains why not all bricks are suitable for sideway mosaics. You should take good care and carefully select your bricks before applying the sideway engine. The applications warns always if mixed bricks are found (also the 1x2 brick), and hopefully this keeps you sharp to make great and colour full mosaics.
And that concludes lesson 4.
Epilogue: What kind of errors can happen with sideway brick walls?